
Why Painting Your Furniture White Makes Perfect Sense
Let me tell you something I learned the hard way after moving into my third apartment in five years. That scratched up dresser your aunt gave you? The coffee table with water rings that tell stories you’d rather forget? They don’t have to end up on the curb. I’ve been down that road of browsing furniture stores, watching my bank account weep as I add up the cost of replacing everything. Then one Saturday, covered in sawdust and paint, I figured out a better way.
Painting wooden furniture white isn’t just about saving money, though we’ll get to those beautiful savings in a minute. It’s about taking something that’s seen better days and giving it a second shot at life. Think about it. That solid wood piece has good bones. The construction is probably better than anything you’ll find at a big box store today. Why toss it when you can transform it?
I’ve painted maybe fifteen pieces of furniture over the years. Some turned out gorgeous. Others? Well, let’s just say I learned what not to do. The difference between a piece that looks professionally done and one that screams “DIY disaster” comes down to patience. And prep work. Mostly prep work, if we’re being honest. You can’t rush this process, trust me. I tried once because I had friends coming over that weekend. The paint was still tacky when they arrived, and someone’s sweater got stuck to my “finished” side table. We still laugh about it, but man, was my face red.
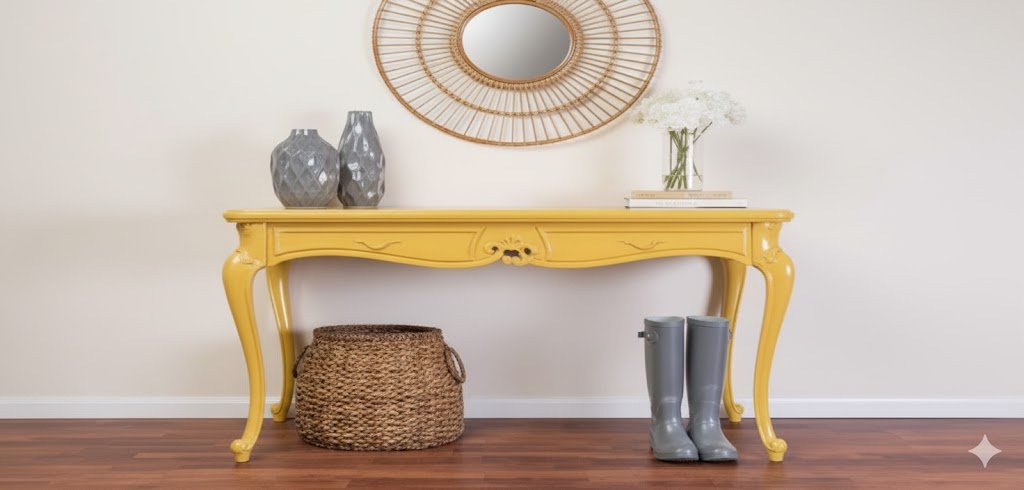
The beauty of going with white paint is how it opens up your space. Dark furniture can make a room feel closed in, like the walls are creeping closer every day. White furniture reflects light. It makes small rooms feel bigger. It gives you a clean slate to work with when you’re decorating. Plus, it never really goes out of style. Trends come and go, but white furniture? It’s been around since your grandmother’s time and it’ll be around long after we’re gone.
Now let’s talk dollars and cents for a second. A decent dresser at a furniture store will set you back anywhere from three hundred to over a thousand bucks. Maybe more if you’re shopping somewhere fancy. You know what it costs to paint one? Maybe forty dollars in supplies if you already have some basic tools. Sixty if you need to buy everything from scratch. That’s not pocket change, but it’s a whole lot less than buying new. I’ve saved thousands over the years doing this myself. Thousands. That’s vacation money. That’s pay off your credit card money. That’s “why didn’t I start doing this sooner” money.
But here’s what nobody tells you when you’re getting started. This project will take time. Not just an afternoon. Not just a weekend if you want to do it right. We’re talking multiple days of drying time between coats. We’re talking sore arms from sanding. We’re talking about testing your patience in ways you didn’t expect. And you know what? It’s worth every minute. There’s something satisfying about stepping back and seeing a piece you brought back to life with your own two hands.
People always ask me if it’s hard. The answer is no, it’s not hard. But it does require attention to detail. You can’t skip steps and expect good results. You can’t use cheap materials and hope for the best. You can’t rush the drying times because you’re impatient. Follow the process, and you’ll get results that’ll make your friends ask where you bought that gorgeous white dresser. Skip steps, and you’ll end up with something that looks, well, homemade in the worst way possible.
I’ve also found that painting furniture is kind of therapeutic. You put on some music or a podcast, and you just zone out while you sand. Your mind wanders. Problems that seemed huge suddenly feel manageable. It’s meditative, in a weird way that getting sawdust in your hair shouldn’t be. Maybe it’s the repetitive motion. Maybe it’s the visible progress you make. Maybe it’s just nice to create something with your hands in a world where most of us stare at screens all day.
The other thing I love about this is how it lets you keep pieces that have meaning. My grandpa’s old workbench sits in my entryway now, painted white and serving as a console table. I could never bring myself to get rid of it, but it was too beaten up to use as is. Now it’s beautiful again, and every time I walk past it, I think about him. That’s worth more than any new piece of furniture could ever be. You can’t buy that kind of connection at a store.
So if you’re sitting there looking at a piece of furniture and wondering if you should paint it or trash it, I’m here to tell you to give painting a shot. What’s the worst that happens? You’re out forty bucks and you learned something. What’s the best that happens? You save hundreds of dollars and end up with a custom piece that looks like it came from an expensive boutique. Those odds work in your favor. And who knows, you might find out you really enjoy this stuff. I never thought I’d be the kind of person who gets excited about paint finishes, but here we are.

Getting Your Workspace and Furniture Ready
Before you crack open a single can of paint, we need to talk about setup. This is where I see people make their first big mistake. They get all excited, grab a brush, and start painting right there in their living room. Then they’re dealing with paint on the carpet, dust settling into wet paint, and a mess that makes them want to give up. Don’t be that person. I was that person once. Learn from my mistakes.
Find yourself a good workspace. Ideally, you want somewhere with ventilation. A garage with the door open works great. A covered patio if the weather’s nice. A basement if you’ve got windows you can crack. I’ve even done this in a spare bedroom with a fan running and windows wide open. Just don’t work in a tiny closet with no airflow. Paint fumes are no joke, and you’ll give yourself a headache that lasts for days.
Lay down your drop cloth before you do anything else. And I mean a real drop cloth, not some garbage bags taped together. I learned this the hard way when a bag split and paint seeped through onto my garage floor. My wife still brings it up three years later. You can get a decent canvas drop cloth at any hardware store for maybe fifteen bucks. It’ll last you for years and multiple projects. Plastic ones work too, but they can get slippery when paint drips on them. Pick your poison.
Now comes the fun part. And by fun, I mean the part where you feel like you’re doing surgery with a screwdriver. You need to remove every piece of hardware from your furniture. Every single one. Knobs, pulls, handles, hinges, those little decorative corner pieces your furniture might have. Everything comes off. I keep a couple of ziplock bags handy and label them so I know what hardware goes where. Nothing worse than finishing a project and realizing you have no idea which knob goes on which drawer.
Take your time with this step. Some screws are going to be tight. Some are going to be stripped. You might need to get creative with a pair of pliers or a different screwdriver. I once spent twenty minutes trying to remove a knob before I realized it was glued in addition to screwed. Had to carefully pry it off without damaging the wood underneath. Patience wins here. Rush it and you’ll gouge the wood or strip screws, and then you’re creating more work for yourself.
Pull out all the drawers. Take off all the doors if you’re working on a cabinet. You want to be able to paint everything flat. Trying to paint a drawer while it’s still in the dresser is asking for drips and uneven coverage. Plus, it’s just awkward. You’ll get paint on the inside of the dresser. You’ll miss spots. You’ll end up with runs because you couldn’t see what you were doing. Just take the extra five minutes to remove everything properly.
Set up your drawers and doors in a way that you can work on all sides. I use old paint cans or blocks of wood to prop things up. This lets me paint the edges without the piece sticking to the drop cloth. You can also grab some of those little pyramid things from the hardware store that are specifically designed for this. They’re like three bucks for a set and they work great. Small investment that makes your life easier.
Here’s a pro tip I wish someone had told me years ago. Take pictures of your furniture before you start taking it apart. I’m serious. Use your phone and snap a few shots from different angles. You think you’ll remember how everything goes back together, but you won’t. I’ve stood in my garage at eleven at night, staring at a pile of hinges and screws, trying to remember which side the door hung on. Photos are your friend. Future you will thank present you for this.
Clean your furniture before you do anything else. Wipe it down with a damp rag. Get rid of dust, grime, that sticky residue that somehow accumulates on everything. If it’s really dirty, use a little dish soap mixed with water. You’d be surprised how much junk builds up on furniture over the years. Paint won’t stick properly to a dirty surface. You’ll end up with spots where the finish just peels right off. I’ve seen it happen, and it’s heartbreaking to watch.
Pay special attention to areas where people’s hands touch the furniture a lot. Drawer fronts, door handles, tabletops. These spots get oils from your skin on them. That oil will prevent paint from adhering. If you’re working on kitchen cabinets or anything near food, there might be grease buildup too. That stuff needs to come off. A degreaser works wonders if soap and water aren’t cutting it.
Once everything is clean, let it dry completely. And I mean bone dry. Water and paint don’t mix. If you start painting while the wood is still damp, you’re going to have problems. The paint will bubble. It won’t dry properly. You’ll kick yourself for not waiting another hour. I usually clean everything the day before I plan to start painting, just to be absolutely sure it’s dry.
Check your furniture for damage while you’re at it. Loose joints? Wobbly legs? Cracks in the wood? Now is the time to fix these things. Wood glue is cheap. Clamps are easy to use. If you paint over problems, they’re still going to be problems. They’ll just be white problems. And trust me, a wobbly white dresser is no better than a wobbly brown one.
Sanding Your Way to a Smooth Canvas
If I could go back and tell my younger self one thing about painting furniture, it would be this. Sand more than you think you need to. Then sand some more. Sanding is the difference between a finish that looks professional and one that looks like you did it in your garage on a Saturday. Which, okay, you did do it in your garage on a Saturday. But it doesn’t have to look that way.
Grab yourself some sandpaper. You’ll want a variety of grits. Start with something around 80 or 100 grit for the rough work. This is your heavy hitter. It’ll strip off old finish and smooth down rough spots. Then move up to 150 grit for your middle pass. Finish with 220 grit to get everything silky smooth. Don’t try to do the whole job with one grit. It won’t work well, and you’ll either work way harder than you need to or not get good results.
An electric sander will save your arm from falling off. I painted my first piece of furniture with just sandpaper and my hand. My shoulder hurt for a week. Now I use a random orbital sander, and it’s like night and day. You can pick up a decent one for maybe thirty or forty bucks. If you’re planning to do more than one piece of furniture, it’s worth the investment. Your arm muscles will thank you.
Sand with the grain of the wood. Always. This is furniture painting rule number one. If you sand across the grain, you’ll create scratches that show through your paint. I don’t care how many coats you put on. Those scratches will haunt you. They’ll catch the light. You’ll see them every time you walk past. Sand with the grain, which means following the lines you see in the wood.
Start with your roughest grit and work the entire surface. You want to remove the old finish completely. If the furniture has a glossy varnish or polyurethane, you need to get through that. The goal is to rough up the surface so your primer has something to grip onto. Think of it like this. Paint can’t stick to a slick surface. You’re creating tooth, which is just a fancy way of saying you’re making the surface slightly rough so the paint can hold on.
You’ll know you’re done with the rough sanding when the old finish is gone and the surface feels uniform. Run your hand over it. If you feel slick spots where the old finish remains, keep sanding those areas. If you feel rough patches or raised grain, that’s actually good. That means you’ve gotten down to bare wood and created the texture you need.
Now grab your medium grit and do another complete pass. This smooths out the roughness from your first sanding without removing the tooth you created. You’re refining the surface. It should start to feel pretty nice under your hand at this point. Not glass smooth yet, but getting there.
After each round of sanding, you need to clean up the dust. And there will be so much dust. I use a tack cloth, which is basically a sticky rag designed to pick up sawdust. You can get them at any hardware store for a couple bucks. Just wipe down all your surfaces, getting into corners and crevices. If you don’t have a tack cloth, a slightly damp regular rag works too. Just make sure it’s barely damp, not wet.
Here’s where people get lazy and I get it. You’re tired. Your arm hurts. There’s sawdust in places you didn’t know sawdust could reach. But you need to do one more sanding pass with your finest grit. This final sanding with 220 grit creates the perfect surface for painting. It removes any remaining roughness while keeping enough texture for good paint adhesion.
Some people skip straight to painting after rough sanding. Their furniture ends up feeling rough even after multiple coats of paint. The texture of the wood telegraphs through the paint. If you want a smooth, professional finish, you cannot skip this final sanding step. I know it seems like overkill. It’s not. This is the difference between looking like you know what you’re doing and looking like an amateur.
For detailed areas, like carved decorations or corners where your sander won’t fit, you’ll need to sand by hand. Wrap your sandpaper around a small block of wood. This gives you control and helps you sand evenly. Trying to sand intricate areas with just paper in your hand leads to uneven pressure and weird results. The block is your friend.
After your final sanding, clean everything again with your tack cloth. Then step back and really look at your furniture. Run your hands over every surface. Feel for rough spots, missed areas, or places where the old finish is still hanging on. Now is the time to fix these problems. Once you start painting, it’s too late. Well, it’s not too late, but you’ll have to strip off the paint and start over. And nobody wants that.
Steel wool is your secret weapon for the final touch. Get yourself some fine steel wool, like 0000 grade. Give everything a light rubbing. This creates an ultra smooth surface and removes any tiny dust particles that stuck around after your tack cloth treatment. It takes maybe ten minutes and makes a huge difference in your final result. I didn’t believe this mattered until I tried it. Now I won’t skip it.
One more dust cleanup after the steel wool. I know, I know. You feel like all you’re doing is cleaning up dust. But this prep work is what separates the good results from the great ones. Paint will highlight every flaw in your surface. Every piece of dust that gets trapped under your paint becomes a permanent bump. Every spot you didn’t sand well enough becomes a rough patch. Get the prep right, and the painting part is actually pretty easy.
Priming and Painting for That Perfect White Finish
We’ve finally made it to the fun part. Well, the part that feels like progress, anyway. Up until now, you’ve been doing prep work that doesn’t look like much. But once you start putting primer on, you’ll see your furniture transform right before your eyes. It’s pretty satisfying, I’m not gonna lie.
Let’s talk primer first. You need primer. I don’t care what the paint can says about being paint and primer in one. Use a separate primer. I’ve tested this both ways on different projects, and primer makes a difference every single time. It creates a uniform base for your paint. It helps the paint stick. It prevents stains from bleeding through. It’s not optional if you want good results.
Pick a good quality primer. I usually go with an oil based primer for furniture, even though it’s a pain to clean up. Oil based primers stick to anything. They seal stains better. They create a harder surface. The tradeoff is that they smell stronger and you need mineral spirits to clean your brushes. If you can’t deal with the smell, water based primer works too. Just make sure it’s designed for furniture, not walls.
Get yourself a decent brush. And by decent, I mean don’t buy the cheapest one at the store. A good brush holds more paint, spreads it more evenly, and doesn’t leave brush marks everywhere. You don’t need to spend thirty bucks on a brush, but spending seven or eight dollars instead of two will change your whole experience. Natural bristle brushes work best with oil based products. Synthetic brushes are fine for water based products.
Before you open your primer, stir it. Don’t shake it. Shaking creates bubbles, and bubbles create a textured finish. You don’t want texture. You want smooth. Use a stir stick and mix slowly but thoroughly. The pigments settle to the bottom of the can, so you need to redistribute them evenly throughout the product.
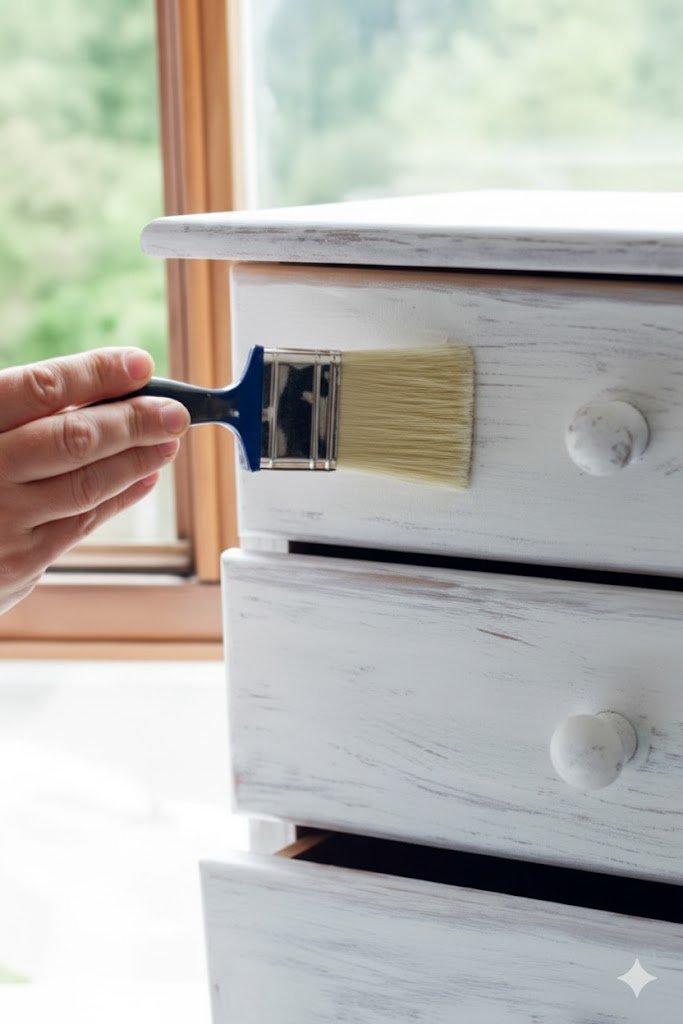
Start painting with the grain of the wood. Same principle as sanding. You’re working with the natural direction of the wood, not against it. Load your brush with a good amount of primer, but not so much that it’s dripping. You want it loaded enough that you can make nice long strokes without having to reload every three seconds.
Apply thin coats. This is maybe the hardest thing for beginners to learn. We want to glob on thick coats because it feels like we’re making more progress. But thick coats take forever to dry. They drip and run. They create an uneven surface. Thin coats dry faster, look better, and build up to full coverage just as quickly when you do multiple coats. Less is more here.
Watch for drips as you work. Paint has a habit of running down vertical surfaces when you’re not looking. Every couple minutes, step back and check your work. If you see a drip starting to form, brush it out immediately. Once it dries, that drip becomes a pain to deal with. You’ll have to sand it off and repaint, which defeats the purpose of working carefully in the first place.
Pay special attention to edges and corners. These are the spots that eat paint. You’ll think you covered them, then you’ll look later and realize you missed spots. I go over edges twice, just to make sure. Better to add a little extra paint than to realize during your final coat that you’ve got bare spots peeking through.
Let your first coat of primer dry completely. Check the can for drying times. Different products dry at different rates. Temperature and humidity affect drying time too. That time listed on the can? That’s for ideal conditions. If it’s cold or humid, add more time. I usually wait longer than the can suggests, just to be safe. Painting over tacky primer is a disaster.
Once the first coat is completely dry, you’ll probably notice it looks patchy. You’ll see the old wood color showing through in spots. The coverage looks uneven. This is completely normal. Don’t freak out. This is why we do a second coat. The first coat seals the wood and creates a base. The second coat provides coverage.
Lightly sand your first coat of primer with 220 grit sandpaper. Just a quick, gentle pass. This is called scuff sanding. You’re not trying to remove the primer. You’re just smoothing out any brush marks or bumps. It also gives your second coat something to grip. Takes maybe five minutes per piece. Don’t skip it.
Clean up the sanding dust. Yes, again with the dust cleanup. I told you this project involves a lot of cleaning dust. Tack cloth or damp rag, your choice. Just get the dust off before you apply your second coat.
Second coat of primer goes on the same way as the first. Thin coats, following the grain, watching for drips. This coat should give you much better coverage. When it dries, you should have a nice uniform white or gray surface, depending on what color primer you used. No wood showing through. No dark spots. Just a clean base ready for paint.
Now we get to the actual paint. White latex semi gloss is the standard choice for furniture. Semi gloss is durable and easy to clean. Flat paint shows every fingerprint and is harder to wipe down. High gloss can look plasticky on furniture. Semi gloss hits the sweet spot. Nice subtle sheen, practical for everyday use.
Use the same technique you used for primer. Stir the paint. Load your brush properly. Apply thin coats following the grain. Watch for drips. You’re a pro at this by now. The only difference is that paint is usually a bit thicker than primer, so be extra careful not to glob it on.
One coat of paint is usually enough if you primed properly. That’s the magic of doing good prep work. I’ve done pieces where one coat looked perfect. I’ve also done pieces where I wanted two coats for extra durability. Kitchen cabinets or anything that gets heavy use? Give it two coats. A decorative piece that doesn’t get touched much? One coat is probably fine.
If you do a second coat of paint, wait for the first coat to dry, do a light scuff sand, clean the dust, then apply your second coat. Same process every time. Consistency is what gets you good results.
Protecting Your Hard Work with a Clear Finish
You’ve painted your furniture. It looks amazing. You’re ready to call it done. But hold on there, friend. We’ve got one more step that’ll take your project from good to great. We need to protect all that hard work you just did. Think of this final clear coat as insurance for your furniture.
Polyurethane is the standard protective finish for painted furniture. It creates a hard, durable surface that can handle daily life. Kids touching it with sticky fingers. Coffee mugs leaving rings. Keys getting tossed on top of it. Without a protective coat, your paint will chip and scratch easier. With it, your furniture can take a beating and still look good years later.
Water based polyurethane is what I use on white furniture. Oil based poly tends to add a slight yellow tint over time, which defeats the purpose of painting something white. Water based stays clear. It also smells less, dries faster, and cleans up with soap and water. The tradeoff is that it’s not quite as durable as oil based, but for furniture, it’s plenty tough enough.
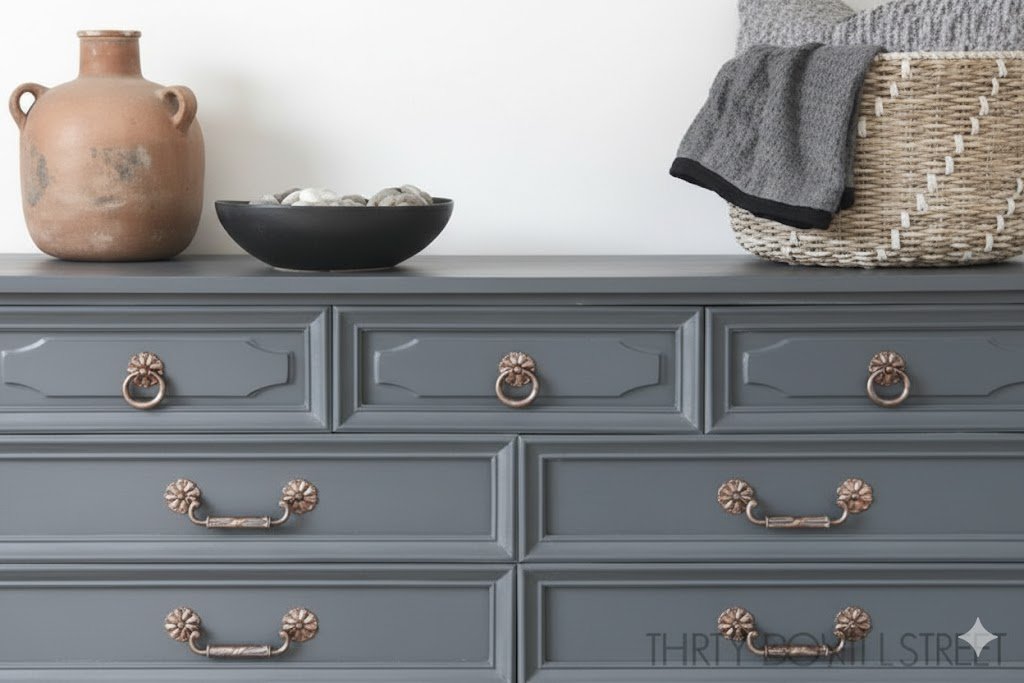
You’ve got options on sheen here too. Satin gives you a subtle shine. Semi gloss gives you a bit more reflection. High gloss is very shiny and shows every imperfection. I typically go with satin for furniture. It looks classy without being flashy. It’s durable without being too slick. But this is personal preference. Pick what looks good to your eye.
Use a clean brush for your polyurethane. Don’t use the same brush you used for paint. Little bits of paint will come off in your clear coat and ruin the finish. Either clean your brush thoroughly between products or just grab a fresh brush. I keep separate brushes for paint and poly to avoid this problem.
Apply polyurethane in thin coats. We’ve talked about thin coats for primer and paint, and it’s even more important here. Poly can really run and drip if you put it on too thick. It also takes longer to dry than paint. A thick coat can stay tacky for hours or even days. Multiple thin coats build up to the same protection level with better results.
Work in a dust free environment if you can. Any dust that lands in wet poly gets stuck there permanently. It’s super annoying. I usually do my poly coats at night when there’s less dust floating around. If you’ve been sanding, wait a few hours for the dust to settle before you start. Wipe everything down one more time. Maybe even damp mop your floor if you’re working in a dusty space.
Brush on the poly following the grain, just like everything else we’ve done. Long smooth strokes. Don’t overwork it. Once you’ve laid down a coat, leave it alone. The more you mess with it, the more likely you are to create brush marks or bubbles. Put it on and walk away. Self control is hard, but it’s necessary.
Poly dries to the touch pretty quickly, but it’s not fully cured for a while. The can will tell you when you can recoat, which might be a couple hours. But full cure time can be several days or even a couple weeks. During this time, treat your furniture gently. Don’t put things on it. Don’t drag stuff across it. Let it fully harden before you start using it normally.
After your first coat dries enough to recoat, do a very light sanding with 320 grit sandpaper. This is finer than anything we’ve used so far. You’re just barely scuffing the surface. If you sand too hard, you’ll cut through the poly and hit the paint. Go easy. The goal is to remove any dust bumps and create tooth for the next coat.
Clean up your sanding dust one last time. At this point, you could probably do it with your eyes closed. Tack cloth, gentle wipe, make sure everything is clean. Then apply your second coat of poly the same way you did the first.
Two coats of polyurethane is the minimum for furniture. Three is better if the piece gets heavy use. Table tops, dresser tops, anything horizontal that will have things set on it regularly should get three coats. The sides and vertical surfaces can probably get by with two. More protection is never a bad thing, as long as you’re applying thin coats.
Let everything dry completely before you even think about reassembling your furniture. I know you’re excited. I know you want to see the finished product. But if you rush this last step, you risk messing up all the work you did. That final coat of poly needs time to harden. Give it at least twenty four hours. Longer if the weather is cold or humid.
When your poly is fully dry to the touch and no longer tacky anywhere, you can start putting things back together. Grab those bags of hardware you labeled at the beginning. Thread the screws back into their original holes. Reattach hinges. Pop the knobs back on. If you took photos at the start, now is when you’ll be glad you did.
Don’t force anything as you reassemble. If a screw doesn’t want to go in, don’t crank on it. You might be in the wrong hole or threading it crooked. Back it out and try again. The last thing you want to do is strip a screw hole in your freshly painted furniture. Take your time. You’ve come this far. Finish strong.
Slide drawers back into place. Hang doors back on their hinges. Step back and admire your work. You just took a sad piece of furniture and turned it into something beautiful. That beat up dresser from your aunt? Now it’s a stunning white piece that looks like it cost a fortune. The coffee table with all those water rings? Clean slate, ready to make new memories.
Give your furniture a full week before you really start using it hard. The paint and poly might feel dry, but they’re still curing at the molecular level. The finish gets harder and more durable as it cures. After a week or two, your furniture will be tough enough to handle whatever life throws at it.
Taking care of your newly painted furniture is pretty straightforward. Clean it with a damp cloth. Don’t use harsh chemicals or abrasive scrubbers. That protective poly coat you put on makes cleaning easy. Spills just wipe right off. Dusting takes two seconds. This furniture will look great for years if you treat it reasonably well.
And that’s it. You did it. You turned an old piece of furniture into something fresh and beautiful. You saved a bunch of money. You learned some skills. And you’ve got a piece in your home that you made yourself. There’s something really satisfying about that. Every time you walk past it, you’ll remember the work you put in. You’ll feel that little spark of pride. That’s worth more than any store bought furniture could ever give you.

Leave a Comment