
Introduction to Striped Bedroom Walls
So you’re staring at your bedroom walls thinking they need something. Not just a fresh coat of paint, but something with a bit more personality. I get it. We’ve all been there, scrolling through design photos at 2 AM, wondering if we can pull off something more exciting than plain beige.
Stripes might be your answer. I know what you’re thinking – stripes sound complicated. They sound like something you’d need a professional for, right? Well, not necessarily. Stripes give you this incredible flexibility with colors, widths, and patterns that plain walls just can’t match. You can go bold or subtle. You can make your ceiling look higher or your room feel cozier. The options are pretty much endless.
Here’s the thing about stripes that I wish someone had told me years ago. They’re forgiving. If you pick colors you love and keep your lines reasonably straight, you’re already 90% of the way there. The other 10%? That’s just having the guts to actually do it. And trust me, once you see how stripes can completely change the vibe of a room, you’ll wonder why you waited so long.
We’re going to walk through everything you need to know about using stripes in your bedroom. I’m talking vertical, horizontal, diagonal – the whole nine yards. We’ll cover color combinations that actually work in real life (not just in those impossibly perfect magazine photos). And I’ll share some tricks I’ve learned the hard way so you don’t have to.
The best part? You can start small. Maybe just one accent wall behind your bed. See how it feels. Live with it for a bit. If you love it, great. If you want to adjust, that’s totally fine too. Your bedroom should feel like your space, not like you’re living in someone else’s design experiment.
Think about what you want your bedroom to feel like. Calm and serene? Energetic and bold? Cozy and intimate? Stripes can help you get there. They’re not just decoration – they’re a tool for shaping how a space makes you feel. And that’s pretty powerful when you think about it.
Ready to see what stripes can do for your bedroom? Let’s get into it.
Vertical Stripes: Making Your Room Feel Taller
Vertical stripes are like magic for rooms with low ceilings. I learned this the hard way in my first apartment, where the ceilings were so low I felt like I was living in a shoebox. Someone suggested vertical stripes, and I was skeptical. But wow, what a difference.
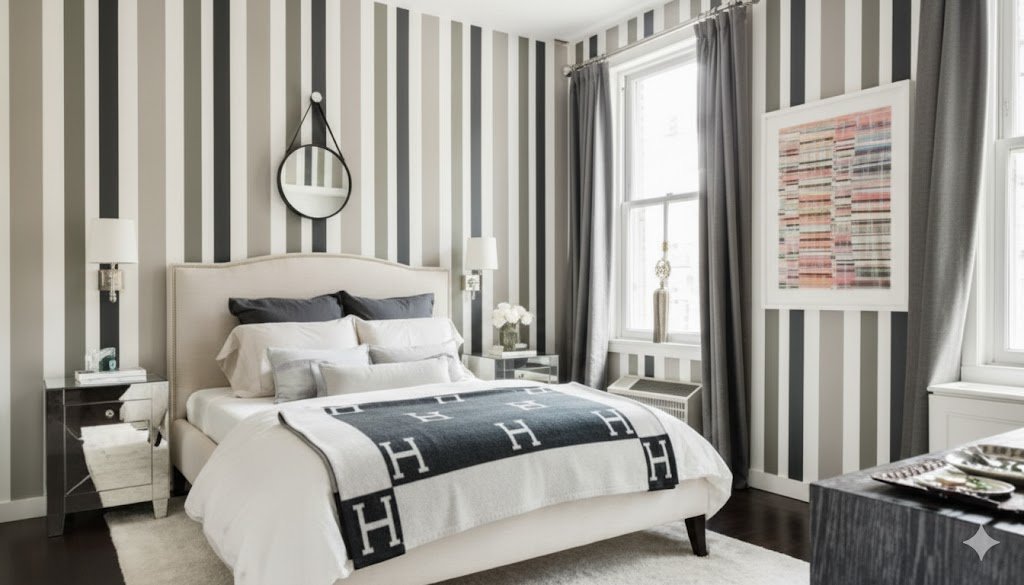
The science behind it is simple. Your eye follows those lines upward, and suddenly your brain thinks the room is taller than it actually is. It’s not actual height, but perceptual height – and that’s what matters when you’re trying to make a space feel less cramped. Black and white stripes work especially well for this. There’s something about that high contrast that really emphasizes the vertical movement. Just don’t make the black stripes too thick, or you’ll lose some of that lightness you’re trying to create.
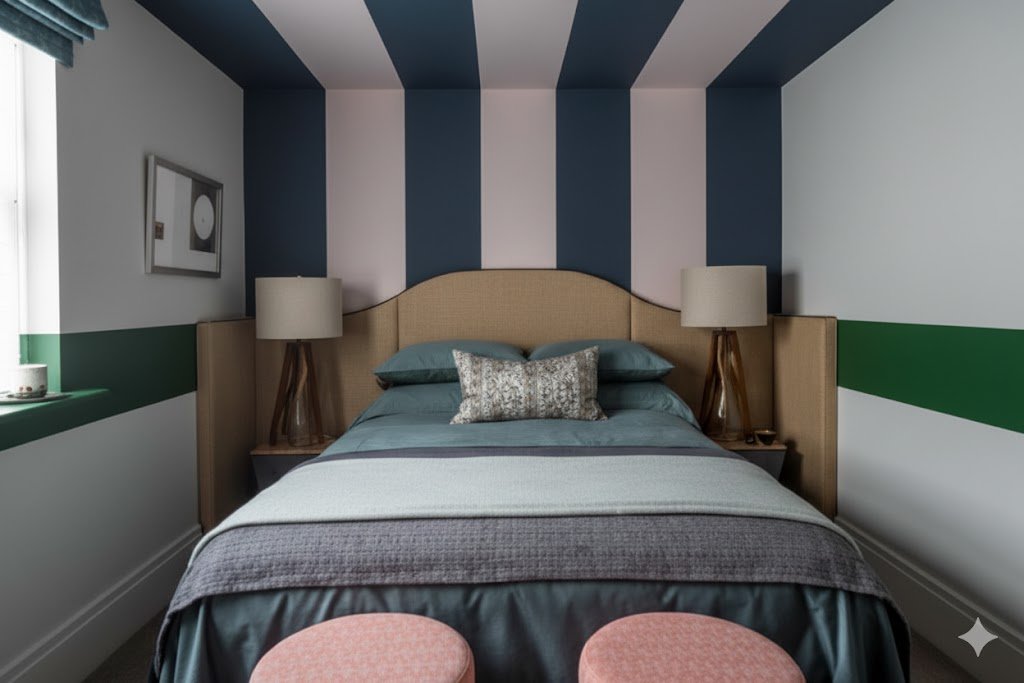
Now, here’s where people often hesitate. They worry about making the whole room striped and ending up feeling like they’re sleeping in a circus tent. Valid concern. That’s why most folks stripe just one wall. Usually the wall behind the bed makes the most sense. It becomes this focal point that draws your eye up and gives the room some drama without overwhelming the space.
The rest of your walls? Keep them simple. Cream, soft white, maybe a very pale gray. You want them to recede so that striped wall can really shine. Think of it like staging – you need some quiet areas so the star of the show can perform. Your striped wall is that star.
Here’s a fun idea I tried last year. Take your stripe pattern and echo it in smaller items around the room. Throw pillows are the easiest. You can find striped fabric pretty much anywhere, or if you’re feeling crafty, you can make your own pillow covers. The stripes on your pillows don’t have to match exactly. In fact, it looks more interesting if they don’t. Play with different widths. Mix in some solid colors. Let it feel a bit collected rather than too matchy-matchy.
Color combinations? Green is underrated for bedrooms. Try three shades – a dark forest green, a medium green, and a light pistachio. Add white stripes between them, and you’ve got something that feels fresh and calming at the same time. Green has this way of bringing the outdoors in without being too literal about it. It works year-round, which is more than I can say for some trendy colors that look great in spring but feel wrong come winter.
Your furniture and textiles should stay fairly simple when you’ve got striped walls. You don’t need competing patterns. You don’t need a lot of fussy details. Let the stripes do the talking. A simple bed frame, solid-colored bedding, maybe one patterned throw if you really want it. That’s all you need.
Want something more subdued? I totally understand. Not everyone wants their bedroom to make a statement. Try adding some brown stripes to your green ones. Or go with earthy tones throughout – think terracotta, sand, warm grays. These colors feel grounded and calm. They won’t wake you up in the morning before your alarm does.
Feeling brave? Fuchsia stripes. Pink stripes. Violet stripes. Yeah, I said it. These colors get a bad rap in bedrooms, but if you balance them with plenty of white or a pale lilac, they can look sophisticated instead of teenage. The trick is restraint. Not every stripe needs to be hot pink. Alternate with neutrals. Give your eyes places to rest.
Red is trickier. Bright reds are stimulating colors. They get your heart rate up. Not exactly what you want when you’re trying to wind down for the night. If you love red, use it sparingly. Maybe as a thin accent stripe rather than a main color. Or save your red for another room where energy is a good thing, like a home office or workout space.
If you picked really bright colors and you’re having second thoughts, you don’t have to repaint everything. Paint your stripes on just the bottom third of the wall. Leave the top two-thirds a pale, calming color. You get the visual interest down low, but when you’re lying in bed looking up, you’re seeing something soothing. Best of both worlds.
Horizontal Stripes: Creating Width and Calm
Horizontal stripes get less love than vertical ones, and I think that’s a shame. They have this completely different energy. Where vertical stripes reach upward, horizontal stripes spread out. They make a room feel wider. They create this sense of calm that works beautifully in bedrooms.
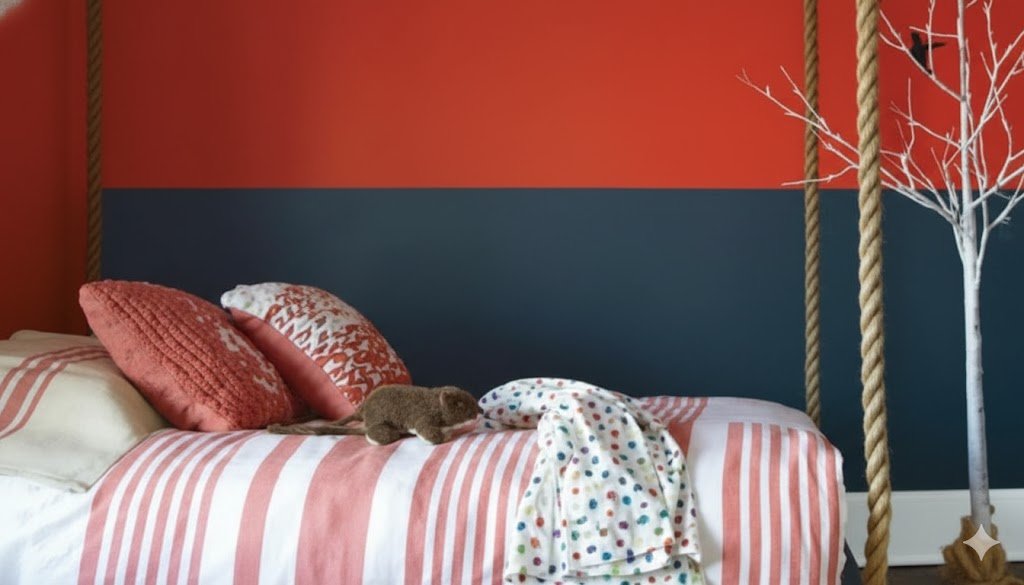
A lot of designers will tell you to stick with light, pastel colors in bedrooms. Soft pinks, pale blues, gentle lavenders. There’s good reason for that advice. These colors genuinely do help people relax. But if you paint your whole room in a single pastel, it can feel a bit flat. A bit boring, if we’re being honest. Horizontal stripes solve that problem. You get your calming colors, but you also get movement and interest.
Try this. Paint horizontal stripes in pastel pink and white. Make them the same width – maybe ten or twenty centimeters each. Not skinny little stripes, but substantial bands of color. The effect is subtle but cheerful. It’s like your walls are wearing a soft, cozy sweater. And who doesn’t want their bedroom to feel like a cozy sweater?
You don’t have to stripe every wall. In fact, I’d recommend against it. Pick one or two walls. Maybe the wall you see when you first walk in. Maybe the wall across from your bed. Wherever you look most often. That’s your stripe wall. Keep the others solid.
Light blue works the same way as pink. So does beige, though you need to make sure there’s enough contrast with white to actually see the stripes. Nobody wants to squint at their walls trying to figure out if there’s a pattern there or not. Gray is another solid option. A soft, warm gray with white can feel really modern and clean without being cold.
Want something more dramatic? Black, gray, and red horizontal stripes look amazing. Very graphic, very bold. But here’s the thing – that combination is probably too intense for a bedroom. Save it for a home office or a study. Somewhere you want to feel alert and focused, not relaxed and sleepy.
Contrasting colors create a totally different vibe. Imagine dark brown stripes alternating with fuchsia and pumpkin orange, with thin white stripes thrown in. Sounds wild, right? It kind of is. That’s why you’d only want to do one wall. Make it an accent wall, a conversation piece. Keep everything else in the room simple so this one wall can be the star.
The interesting thing about horizontal stripes is they can make a room feel shorter if you’re not careful. That’s not always bad. If you have really high ceilings and your room feels cavernous, horizontal stripes can bring things down to a more human scale. But if your ceilings are already low, vertical stripes are probably a better bet.
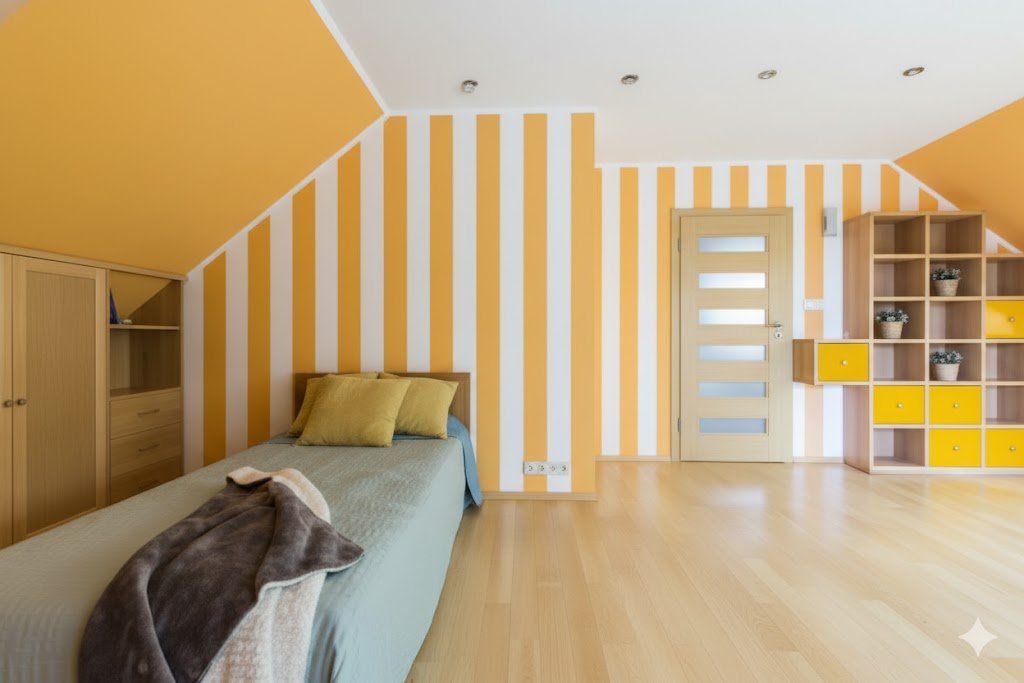
Yellow and white horizontal stripes work great in small rooms. They reflect light. They feel sunny and warm. I’ve seen this combination in tiny guest bedrooms where it really opens up the space. Bathrooms too. There’s something about yellow and white that just feels clean and fresh.
Width matters with horizontal stripes. Thin stripes read as busy. They create a lot of visual activity. Thick stripes feel calmer, more grounded. Think about the mood you’re going for. If you want your bedroom to feel serene, go wider. If you want energy and movement, go thinner.
Painting horizontal stripes is actually easier than vertical ones in some ways. You’re working with gravity instead of against it. Your paint is less likely to run in weird directions. You can use painter’s tape to mark your lines, and if you take your time, you’ll end up with crisp, clean edges.
One more thing about horizontal stripes – they’re forgiving when it comes to wall imperfections. Those little bumps and dips that drive you crazy with solid paint? They kind of disappear into the pattern with stripes. Your eye is too busy following the lines to notice the texture underneath.
Diagonal and Zigzag Stripes: Adding Dynamic Energy
Diagonal stripes are where things get really interesting. And by interesting, I mean you need to be sure about what you’re doing. These aren’t your safe, predictable stripes. These stripes have opinions. They demand attention. They change the entire energy of a room.
Diamond patterns are probably the most classic way to use diagonal stripes. Picture this – gray diamonds with thin white lines creating the shapes. You get geometric interest without going too crazy. It feels innovative but not trendy. Classic but not boring. That’s a hard balance to strike, and diagonal diamonds somehow manage it.
The gray and white combo works particularly well if the rest of your room has traditional furniture. Maybe you’ve got a wooden bed frame, some vintage nightstands, classic bedding. The diagonal pattern brings in just enough modernity to keep things from feeling stuffy or dated. It’s like mixing an old blazer with new jeans – the contrast makes both pieces look better.
Now let’s talk about zigzags. Chevron patterns, if you want to be fancy about it. These can be absolutely stunning. They can also be absolutely exhausting to look at. The difference comes down to how much you use them and how bold you go with the colors.
A single zigzag accent wall can look incredible. It’s dynamic. It’s got movement. Your eye follows those angles, and the whole room feels more energetic. But zigzag all four walls? That’s a lot. That’s potentially headache-inducing. That’s something you might love for a week and then desperately want to repaint.
If you’re going to do zigzags, commit to it being a statement. Pick one wall. Make it count. Use colors with decent contrast so the pattern really pops. And then balance it out with calm, solid colors everywhere else. Your bedding, your curtains, your furniture – keep them simple. Let the wall be the wild child in an otherwise well-behaved room.
The risk with diagonal stripes is they can feel dated faster than other patterns. They’re trendier. More tied to specific moments in design history. So you need to be honest with yourself about whether you’re okay with that. Are you someone who likes to change things up every few years anyway? Then go for it. Are you someone who paints once and wants it to last a decade? Maybe reconsider.
Diagonal stripes also mess with your sense of space in unexpected ways. They don’t clearly make things feel taller or wider like horizontal and vertical stripes do. They create this ambiguous spatial quality that can feel really cool or really weird, depending on the room and your personal taste.
Here’s something I learned from trying diagonal stripes in a small bathroom – they work better in bigger spaces. In tiny rooms, all those angles can make the space feel chaotic. But in a good-sized bedroom, they create visual interest without overwhelming.
Color choice matters even more with diagonal patterns. Soft, analogous colors (colors next to each other on the color wheel) will give you movement without aggression. Complementary colors (opposites on the wheel) will be much more intense. Think about how you want to feel in the space.
One approach that works well is keeping your diagonal stripes subtle. Maybe just two or three shades of the same color. The pattern creates interest through shape rather than relying on bold color contrasts. This gives you the benefits of diagonal stripes without as much risk of it feeling overwhelming.
If you love the idea of angled stripes but you’re nervous about committing, there’s a middle path. Try it in a smaller space first. A walk-in closet. A powder room. Somewhere you’re in and out of quickly. See how it makes you feel. If you love it, bring it to your bedroom. If you’re on the fence, you’ve only committed to a small space.
Testing matters with any bold design choice, but it matters even more with diagonal stripes. Paint a sample board. Live with it leaning against your wall for a week. Look at it in morning light, evening light, lamplight. Make sure you still love it after the novelty wears off.
Alternative Ways to Add Stripes Without Painting
Maybe you’re reading all this and thinking “this sounds great, but I rent” or “I’m not ready to commit to paint.” I hear you. Painting is permanent (or at least semi-permanent), and that can feel like a lot of pressure. Good news – you’ve got options.
Keep your walls simple. One solid color, or even just white if that’s what you’ve got. Then bring stripes in through other elements in the room. This gives you all the visual benefits of stripes with way less commitment. And you can change things up whenever you want without picking up a paintbrush.
Artwork is the easiest starting point. Find a large print or painting with stripes. Hang it above your headboard. It becomes a focal point, gives you that striped effect, but stays completely removable. You can find striped artwork in literally any color combo you want. Abstract, representational, graphic, painterly – whatever matches your style.
The trick with striped artwork is scale. Too small and it just looks like a random decoration. You want something substantial. Something that feels like it has presence. Think at least 60 or 90 centimeters wide. Big enough to anchor the space above your bed.
Curtains are another great option. Striped curtains can completely change how a room feels. Vertical stripes on curtains will emphasize your window height. Horizontal stripes will make your windows feel wider. And because curtains are fabric, they add texture and softness that painted stripes don’t have.
You can go bold with curtains in a way you might not with paint. Really bright colors, thick stripes, unusual color combinations – it all works because curtains are such a distinct element. They’re supposed to draw attention. They’re not trying to be subtle background players.
Rugs give you another chance to add stripes. A striped rug at the foot of your bed or running along one side creates this grounding horizontal line that anchors the whole room. Rugs are expensive, yeah, but they last for years. And when you move or want a change, you just roll it up and try something different.
Striped rugs come in every style you can imagine. Nautical navy and white. Bold black and white. Soft pastels. Bright primaries. Vintage-style faded stripes. Modern geometric patterns. You’re not limited the way you might be if you were trying to paint specific stripes on your floor.
Bedding is probably the most obvious place to add stripes, and yet a lot of people don’t think of it. A striped duvet cover or comforter brings pattern right to the center of your room. You see it every time you walk in. You see it every night before you fall asleep. It has a big impact on the overall feel of the space.
The nice thing about striped bedding is you can layer it. Striped sheets under a solid duvet. Or solid sheets under a striped duvet. Mix in some solid-colored pillows, maybe one or two striped ones. Play with the layers until it feels right. There’s no single correct answer – it’s about what looks good to your eye in your space.
Throw blankets are an underrated tool. A striped throw folded at the foot of your bed or draped over a chair adds just a hit of pattern. Not enough to dominate, but enough to add interest. And throws are cheap enough that you can have a few and switch them out seasonally or just when you feel like a change.
Wallpaper has made a huge comeback, and you can get peel-and-stick versions now that are actually renter-friendly. Striped wallpaper gives you the impact of painted stripes with less work and less permanence. You can do a whole wall or just a section. And when you’re done with it, you peel it off. No spackle, no sanding, no repainting.
The selection of peel-and-stick wallpaper is actually really impressive now. You can find hand-drawn looking stripes, perfectly geometric stripes, watercolor stripes, metallic stripes. Every width, every color combination. It’s worth browsing even if you think you’re not a wallpaper person.
Furniture can have stripes too. A striped upholstered headboard. A striped bench at the foot of the bed. A striped armchair in the corner. These pieces bring in pattern at a smaller, more manageable scale. And good furniture lasts, so it’s an investment in your space that pays off over time.
The key with all these alternatives is thinking about balance. You don’t want stripes everywhere. Pick one or two elements to be striped, and keep the rest solid. Let there be visual breathing room. Too much pattern, even good pattern, gets tiring. Your eye needs places to rest.
Tips for Actually Doing It: The Practical Stuff
So you’ve decided to go for it. You’ve picked your wall, chosen your colors, and you’re ready to stripe. Now what? Let me save you from some of the mistakes I made when I first tried this.
Prep work matters more than you think. Your walls need to be clean. Really clean, not just “looks okay from across the room” clean. Dust, dirt, and grease will all mess with how your paint goes on and how it sticks. Wipe everything down with a damp cloth and let it dry completely. I know it’s boring. Do it anyway.
If your walls have holes or cracks, fill them now. Sand them smooth. You might think the stripes will hide imperfections, but they won’t. If anything, they’ll highlight them. The lines draw your eye along the wall, and any bumps or dips become really obvious. Take the time to get a smooth surface to work with.
Painter’s tape is your best friend. Good quality painter’s tape, not the cheap stuff that lets paint bleed under the edges. Yes, the good tape costs more. Yes, it’s worth it. Nothing is more frustrating than carefully painting stripes and then peeling off the tape to find fuzzy, wobbly edges.
Here’s a trick for even sharper lines. After you put your tape down, paint over the edges with your base color first. This seals the edge of the tape. Then any bleed-through is the base color you already have. When you paint your stripe color on top, it stays crisp. Trust me on this one.
Measuring is tedious but necessary. You need to mark where each stripe will go before you start taping. Use a level. Use a tape measure. Double-check everything. Stripes that are slightly off-level or inconsistent widths will bug you forever. Well, they’ll bug me forever. Maybe you’re more relaxed about these things.
Start from the ceiling or the floor and work your way across. Mark your first stripe placement, then measure from there to the next one, and so on. This way any tiny measurement errors accumulate at the far edge rather than messing up your whole pattern. Math people will understand why this matters.
When you paint, use thin coats. Multiple thin coats look better than one thick coat. Thick paint is more likely to run, more likely to bleed under tape, more likely to look uneven when it dries. Thin coats might mean more work, but the final result is so much better.
Wait for each coat to dry completely before doing the next one. I know you’re impatient. I know you want to be done. Rushing this step will ruin everything. Go do something else for a few hours. Watch a movie. Take a walk. Let the paint dry properly.
Peel the tape off while the final coat is still slightly tacky. Not wet, but not completely dry. This is the sweet spot where the tape will come off clean without pulling any paint with it. Wait too long and the paint can chip along the tape edges. Peel too early and the paint might smear.
If you’re doing a complicated pattern, diagonal stripes, or anything with a lot of color changes, maybe get help. Having someone else there to hold the tape, help with measuring, or just double-check your work makes everything easier. Plus it’s more fun. Put on some music, order pizza, make a day of it.
And if you get partway through and realize you hate it? Stop. You don’t have to finish. You can paint over what you’ve done and try something else. Or you can leave the walls solid and add stripes through accessories instead. There’s no stripe police who will come arrest you for changing your mind.
The most complex patterns probably do call for a professional. Someone who paints for a living has seen it all. They know how to handle tricky corners, uneven walls, and complicated color transitions. They have better tools and more experience. If you’re unsure of your skills or just don’t want the hassle, hiring someone is totally valid.
But for basic vertical or horizontal stripes in a straightforward color scheme? You can absolutely do this yourself. It takes patience more than skill. Measure twice, tape carefully, paint thin coats. That’s really the whole secret. Well, that and accepting that it might not look perfect, and that’s okay. Perfectly imperfect is still beautiful.
Your bedroom is your space. It should make you happy. If stripes do that, then stripes are the right choice. Don’t overthink it. Don’t let fear of making a mistake keep you from trying something new. Paint can always be repainted. Walls are forgiving that way. So pick up that brush and give those walls some personality.

Leave a Comment